Ten Small Projects to Reset Your Home This Spring
Spring is a natural time to reset. The light shifts, energy returns, and suddenly that junk drawer feels personal. Getting started on a spring project is the hardest part, but we’ll let you in on a little secret: you don't need a free weekend or a full closet overhaul to make progress. You just need ten minutes and a spring cleaning checklist.
NEAT in 10 is a simple, guided reset designed to help you create calmer, more functional spaces without tackling your whole home at once. Over ten weekdays, following our spring cleaning guide, you'll complete one small organizing project a day, each designed to take only ten minutes.
Each project focuses on a space that reduces visual clutter, builds momentum, and makes your home feel a little more supportive. Whether you're brand new to organizing or just need a gentle nudge, NEAT in 10 meets you where you are with these easy spring cleaning tips.
Ten minutes a day. Ten days. A home that feels easier to live in.
DAY 1

Why this project matters: Where’s the best place to start spring cleaning? That top drawer you open every morning sets the tone for your whole routine. When it's cluttered with old products and things you rarely use, you start your day sifting through chaos. When it holds only what you need, your morning moves faster and feels calmer.
What you'll need: A trash bag or bin, a damp cloth for a quick wipe-down
The process:
- Empty the entire drawer onto your counter. Seeing everything you own together helps you make more informed decisions.
- Toss anything expired, dried out, or that you haven't touched in months. Be honest, those sample products aren't getting used.
- Sort what remains into two piles: daily use and occasional use. Daily means you reach for it every single morning or night.
- Relocate occasional items to a different drawer or cabinet. This drawer is prime real estate so only your everyday essentials belong here.
- Wipe down the empty drawer, then arrange your daily items back inside. Group similar things together (oral care, skincare, etc.) and place what you reach for first toward the front.
Pro organizing tip: Toothbrush and toothpaste, deodorant, daily skincare, sunscreen, contact solution—anything that's genuinely part of your everyday routine are the only things that should live in this drawer.
Level up: Want your freshly edited drawer to stay that way? Our Acacia Drawer Organizers give every item a dedicated spot, so things don't slowly migrate back into chaos. The warm wood adds a spa-like feel to your everyday routine, and the modular sizes let you customize the layout to fit exactly what you kept.

DAY 2

Why this project matters: Dish towels multiply quietly and never fold themselves. Before you know it, you're shoving the drawer closed and grabbing whichever towel you can pull free. A streamlined collection means you always know what you have and can actually access it.
What you'll need: A donation bag, a flat surface for folding
The process:
- Pull every dish towel out of the drawer and any other spots they've wandered to (oven handle, countertop, laundry pile).
- Donate any that are well loved, aka torn, stained, or threadbare. Thank them for their service and let them go.
- Keep only what you actually use. Most households need far fewer dish towels than they own.
- File fold each towel to fit the height of your drawer. Fold in thirds lengthwise, then fold down until the height matches your drawer depth. Make sure to fold them all to the same width for a clean, uniform look.
- Stand your folded towels upright in a row, fold facing up like files in a cabinet.
Pro organizing tip: The file folding method gives you a quick visual of everything you own and makes it simple to grab what you need without disturbing the rest of your collection. No more digging to the bottom of a stack.
Level up: Acacia Drawer Dividers keep your neatly folded row of towels in line and separate them from other categories sharing the same drawer, like oven mitts or pot holders. One divider turns a messy multipurpose drawer into a system that actually holds its shape.

DAY 3

Why this project matters: Half-empty bottles and mystery sprays don't spark motivation. When you can't find what you need or aren't sure what you even have, cleaning feels harder than it should. A streamlined collection grouped by purpose makes tackling messes faster and less frustrating.
What you'll need: A trash bag, a box for items to give away, labels
The process:
- Pull out every cleaning product from under sinks, closets, laundry rooms, and anywhere else they've accumulated.
- Consolidate duplicates by pouring half-empty bottles of the same product into one container.
- Toss anything expired, dried out, or unidentifiable. If you don't know what it is or when you bought it, let it go.
- Give away products you're no longer using. That specialty cleaner you bought for one project doesn't need to take up space forever.
- Group what's left by type: glass and surface cleaners, bathroom cleaners, floor care, specialty products.
- Focus your most commonly used cleaners—disinfectant, wipes, glass cleaner—in a single accessible space like under the kitchen sink.
- Store any overflow in a laundry room or cleaning closet if space allows.
Pro organizing tip: Consider corralling each type within its own labeled bin. Labels take the guesswork out of putting things back and help everyone in the household maintain the system.
Level up: Grid Baskets are built for the challenge of under-sink storage. The elevated metal frame is durable and keeps products stable, while the acacia wood bottom provides a flat surface so bottles don't tip. They come in multiple sizes to work around those awkward pipes and turn wasted space into functional storage.

DAY 4

Why this project matters: Mismatched, stretched out, missing a partner for months—socks have a way of taking over. Today's the day to edit ruthlessly and enjoy a drawer that actually closes.
What you'll need: A trash bag, a donation bag if socks are still in good condition
The process:
- Gather all your socks together from every corner of your home. Look in dresser drawers, the laundry basket, the dryer, and that pile on the floor.
- Sort by type: athletic, dress, casual, no-show, cozy.
- Edit out any that are well loved (holes, thinning heels), missing a mate, or you simply don't wear. If your sock drawer is bursting at the seams, this is also a good time to edit out any excess.
- File fold in pairs rather than tucking one sock inside the other. This prevents the elastic from stretching out over time and keeps pairs easy to grab.
- Color code within each category to simplify finding what you need. Dark to light or by color family both work well.
- Place socks back into the drawer, keeping them grouped by type.
Pro organizing tip: Tucking one sock into the other stretches the elastic and shortens the life of your socks. File folding keeps pairs together, visible, and in better shape longer.
Level up: Springform Acacia Drawer Dividers keep rows of socks neatly in line. They come in four sizes to accommodate almost any drawer and can be shifted as your collection changes. Perfect for separating athletic from dress or creating boundaries between multiple categories in one space.
DAY 5

Why this space matters: The entryway catches everything that comes through the door, and without a system, it quickly becomes a cluttered first impression of your home, creating a spring cleaning and organizing emergency. A functional drop zone saves time every single day and keeps those last-minute "where are my keys" moments to a minimum.
What you'll need: A trash bag, a bin for items to relocate, trays or baskets for sorting
The process:
- Clear everything off the surface where items tend to land. Yes, everything.
- Separate what you've gathered into categories: mail, keys, sunglasses, wallets, lip balm, dog leash, whatever tends to accumulate.
- Relocate any categories or items that don't actually belong in the entryway. Shoes go to the closet, random toys back to the playroom.
- Edit out anything that needs to be tossed or donated. Old mail, dried out pens, expired coupons.
- Based on your available space, create landing zones for each category that stays. In most homes that includes a mail drop and a tray to catch keys, sunglasses, and chapstick.
- Make it work for you and the needs of your family. If backpacks and lunchboxes live here too, build that into the system.
Pro organizing tip: Give everything a place to land and set limits. One tray for mail and one spot for keys. Once they fill up, that’s your sign to give them an edit.
Level up: Metal Perforated Baskets make it easy to sort mail before it piles up. The removable divider makes it easy to contain two categories in one spot, like "needs attention" and "to file" or "to shred." Drop it on a console table or shelf and give incoming mail a system instead of a stack.

DAY 6

Why this space matters: It piles up fast and the guilt is real. Every painting, scribble, and handprint craft feels precious in the moment, but the stack on the counter keeps growing. Creating a system for what comes in (and what moves on) lets you appreciate their creativity without drowning in paper.
What you'll need: A vessel for keepsakes, your phone for photos, a recycling bin
The process:
- Gather all the artwork that's accumulated around your home. The counter, the fridge, the bottom of backpacks.
- Sort into three piles: display, save, and let go.
- Pick your favorites to frame, hang, or rotate on a display wall. A few meaningful pieces have more impact than a cluttered gallery.
- Photograph the rest before letting it go. A quick snapshot preserves the memory without the paper.
- Recycle the stack that's been sitting on the counter for weeks. It's okay. You're allowed.
- Designate a keepsakes bin for the pieces you're saving long-term. One bin per child keeps the collection manageable.
A note on involving kids: Depending on your child's age, you may or may not want to include them in the process. If attachment and emotions tend to run high, it's probably best to edit on your own.
Pro organizing tip: Artkive books let you appreciate a large collection of art (even those 3D pieces) in one slim book. Ship the artwork to them and they'll photograph everything and print it beautifully. A great option for collections you're ready to part with but not ready to forget.
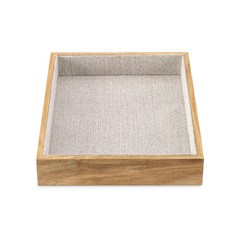
Level up: Lined Acacia Trays make a perfect landing zone for artwork as it comes home from school. Place one in a home office, on a closet shelf, or in your drop zone. Once it's filled, give the collection one last edit and relocate your favorites to a keepsakes bin. The tray sets a natural limit and keeps paper from spreading across every surface.
DAY 7

Why this space matters: How many fitted sheets does one household need? Overflowing linen closets make it hard to find what you're looking for and even harder to put things away. Editing down to what you actually use means folded stacks that stay neat and shelves that finally have breathing room.
What you'll need: A donation bag, a recycling bag for worn items, a flat surface for folding
The process:
- Gather all your bed linens together from every closet, shelf, and tucked-away corner.
- Remove any sheets that are torn, stained, or missing pieces of the set. These can be recycled or donated to animal shelters.
- Consider donating excess sets that are no longer being used, especially sizes you no longer have beds for.
- Fold the sets you're keeping and store them together. Tuck the folded flat sheet and pillowcases inside the folded fitted sheet to keep each set contained.
- Place folded sets in a fabric bin or in neat stacks on a linen closet shelf, grouped by bed size.
Pro organizing tip: One set on the bed, one set in the closet. Anything beyond that is taking up space without earning its keep.
Level up: Oxford Bins are ideal for separating sets by size and keeping stacks from toppling. The upholstery-grade fabric won't snag delicate linens, and the structured sides keep everything standing upright. File fold within each bin to increase the overall visual and make it easy to grab exactly the set you need.

DAY 8
 Why this space matters: Stuffed in a cabinet, shoved in a trunk, multiplying in the coat closet. Reusable bags are great in theory, but only if you can find them when you need them. A curated collection stored in one spot means you'll actually grab them on your way out the door.
What you'll need: A donation bag, a bin or drawer for storage
The process:
- Gather every reusable tote from around your home. Check the coat closet, pantry, car trunks, mudroom, and under the sink.
- Edit out any that are prone to tearing, stained beyond use, or promotional bags you never reach for.
- Keep only what you'll actually use. For most households, ten to fifteen quality totes is plenty.
- Donate the rest. Thrift stores and food banks often accept reusable bags in good condition.
- Designate one spot for the keepers. A bin or drawer in the pantry or laundry room works perfectly.
- Totes shoved into a pile become invisible. File fold them instead so you can easily see and grab what you need without unraveling the whole collection.
Pro organizing tip: Store a few in each car permanently so you always have them when you need them. No more "I forgot the bags" moments in the parking lot.
Level up: Lined Acacia Bins are a favorite solution for corralling your edited tote collection. The fabric lining won’t snag fabrics and the opaque design hides visual clutter from sight, keeping your pantry or laundry room looking clean even when the bin is full.

DAY 9

Why this space matters: Mismatched hangers make your coat closet feel chaotic. Wire, plastic, and random hangers from years past create an uneven visual with coats hanging at different heights. A matching set instantly elevates the look and makes the space feel intentional.
What you'll need: A set of matching hangers, a bag for hanger donations
The process:
- Remove everything from your coat closet and set it aside.
- Gather all the hangers and sort by type. Wire, plastic, wooden, mismatched.
- Donate the wire and plastic hangers you've been holding onto.
- Select a matching hanger set that suits your space and the weight of your coats.
- Rehang each coat on a matching hanger, making sure to fasten buttons and secure zippers.
- Arrange coats and jackets facing the same direction for a clean, cohesive look.
- Step back and enjoy a closet where everything hangs at the same level.
Pro organizing tip: Most dry cleaners will accept wire hanger donations. Drop them off on your next visit and clear them out of your home for good.
Level up: Durable Everyday Coat Hangers deliver an elevated look that stands up to heavy coats and jackets. The rubberized texture keeps clothes from slipping to the floor, and the consistent shape gives your closet that curated, intentional feel. One swap, big impact.

DAY 10

Why this space matters: Clothespins, loose change, lost socks. Every laundry room has that little landing zone where random items accumulate. Without a system, it becomes a junk drawer you walk past every day. A few minutes of editing and a little containment turn it into a space that actually works.
What you'll need: A small bin for relocating items, a trash bag, containers for sorting
The process:
- Empty everything from the surface or basket where laundry room clutter tends to land.
- Sort what you find into categories: coins, clothespins, single socks, and items that don't belong.
- Reunite any sock pairs you find and return them to their rightful drawers.
- Relocate anything that doesn't belong in the laundry room. Pens, toys, and those random pebbles can go back to their proper homes.
- Say goodbye to socks that have gone without a mate for longer than a month. If the match hasn't turned up by now, it's not coming back.
- Create designated spots for the items that stay. A container for coins, a container for clothespins, and a small bin for lost socks.
- Commit to emptying the lost sock bin every few months to keep it from becoming a permanent collection.
Pro organizing tip: Small items without a home spread fast. Even lint needs somewhere to land. Consider placing a small enclosed garbage can or designated lint bin on the side of the dryer to collect it.
Level up: Glass Jars are a perfect solution in the laundry room. Use one to collect loose change and another as a permanent home for clothespins. For lost socks, a Small Grid Basket keeps them corralled and visible until their match appears.

xx,
the NEAT team


